Design Project: EcoClaw
- 2016年12月7日
- 讀畢需時 6 分鐘


As a team, we decided that it would be our goal to combat pollution and littering with a smart solution that would encourage people to take care of their environments and communities. The Eco-Claw will be a tool that can be used to pick up solid waste while counting the amount of waste picked up, reflected in an enticing milestone-reward system. The counter and the competitive game mentality, similar to products such as the Fitbit and Apple watch, can create a new perspective and added incentive towards cleaning the environment, and can provide valuable statistics at the same time.
Materials:
Garbage claw (Model)
Wire
IR sensor https://www.adafruit.com/products/466
Accelerometer https://www.adafruit.com/products/1120
OLED display screen https://www.adafruit.com/products/938
3D printer and filament
Handle right side
Handle left side
IR sensor casing
Computer
Autodesk Fusion 360
Fritzing
Arduino IDE
Black electrical tape
Small nut (Dimension?)
Small bolt (Dimension?)
Adafruit FLORA microprocessor
Process Components:
Remove claw handle from existing garbage claw
Remove one end grip from existing garbage claw
Write code for the OLED display
Download libraries for this particular screen from https://learn.adafruit.com/monochrome-oled-breakouts/arduino-library-and-examples
Create templates for the different displays that will appear throughout use (these will appear when certain conditions are met later in the coding)
Text screens were used for this particular device. Here is an example of what should be displayed:
//Setup Main screen
display.setTextSize(2);
display.setTextColor(WHITE);
display.setCursor(4,4);
display.println("EcoClaw!!");
display.display();
delay(2000);
display.clearDisplay();
display.setTextSize(1);
display.setCursor(4,4);
display.setTextColor(BLACK, WHITE);
display.println("ToGetOne TrashPoint! Start!");
delay(1000);
display.display();
delay(1000);
display.clearDisplay();
display.setTextSize(1);
display.setCursor(4,4);
display.setTextColor(WHITE);
display.println("ToGetOne TrashPoint! Start!");
delay(10);
display.display();
delay(200);
display.clearDisplay();
display.invertDisplay(true);
delay(1000);
display.invertDisplay(false);
delay(1000);
display.clearDisplay();
[image2 of screens]
//display counter
display.setTextSize(1);
display.setTextColor(WHITE);
display.setCursor(4,4);
display.println("EcoClaw Trash Points:");
display.display();
display.print("EcoPoints: ");
display.print(counter, DEC);
display.display();
delay(200);
display.clearDisplay();
Write code for the IR sensor
Download libraries for this particular sensor from https://learn.adafruit.com/adafruit-lis3dh-triple-axis-accelerometer-breakout/wiring-and-test
The IR sensor should be able to tell when it grasps an object based on proximity. Based on our testing and trials with this sensor, we believe this to be an accurate proximity distance for detecting an object with this sensor:
float proximity = ((data[2] * 256) + data[3]); //get data from library
if((proximity)>3500){
x = 1;
Serial.print("OBJECT DETECTED!");
}
else{
x = 0;} // detect object, 3500 comes from test
Write code for the accelerometer
sensors_event_t event; lis.getEvent(&event); //get X Y and Z data at once
if ( event.acceleration.y > -7 && event.acceleration.y < 0){
f=1;}
else {
f=0;} //detect motion of picking up things; using “y” is according to the position we place the accelerometer
IR Sensor + Accelerometer Integration
The IR sensor and Accelerometer both collect data individually; however, when the data is combined, the claw can detect when you have successfully picked up trash. The IR sensor lets the claw know if it is currently holding an object and we have selectively chosen proximity values for the sensor so if the claw is closed but is not holding an object, it will not read that as holding an object. The accelerometer lets the claw know if it has moved up, resembling an action which the user would have to take in order to move the trash into a trash bag or container of some sort. When these two bits of data work together in unison, Eco Claw can tell you that you get a trash point and count numbers. Here is how we code that:
int r = 0 ;
int t = 0;
int counter = 0; // int values
if (x==1 && f==1) { //means you pick up an object and move up
r=1;
}
else if (x==1 && f==0) { //means you pick up an object and keep it but do not throw it down
;
}
else {
r=0;
} //combine IR sensor and Accelerometer
if (r != t) { // (the counter will work only when r and t are different)
when first loop (r=1, t=0) pick up one! Second loop(r=0, t=1) not work!
So the if statement waits until r=1 again, which means you need to throw first object down and pick another object to make r=1 again. This statement stops counter to count continuously when picking up one object.
if(r == 1 ){
Counter++;
Serial.println("on");
Serial.print("number of picks: ");
Serial.println(counter);
} else {
Serial.println("off");
}
delay(200);
}
t= r ;
} //force t and r the same (t=r=1) or (t=r=0)
3D Model and Print Handles
The Handle should be either taken from the existing file created by Leopard Keyboard or designed to fit the critical pivot points for the trigger on the existing claw, as well as the metal shaft of the existing claw. We recommend using the Autodesk Fusion 360 program with the Autodesk Inventor subset.
Below is an example of the dimensions that we recommend to fit all of the necessary components of the handle, such as the Adafruit FLORA microprocessor, the LiPo rechargeable battery, the OLED display, and any other wires that connect these and the accelerometer/IR sensor.
When modeling the handle, be sure to consider comfort of grip, reducing the number of sharp edges as much as possible.
Two versions of the handle should be made: one for the left side, and one for the right side. The handles should include male and female threaded holes for connecting the two, and the handle for the right side should have the opening to allow the OLED screen through.
As shown in the dimensioned sketch, the handle should be able to fit all necessary components
For ease of access, a port was added to the back of the claw for the event of quick recharging
For printing, an Ultimaker 2 printer was used. Because of raised, flat surfaces that are not in contact with the printer bed, generating supports is recommended, and is most easily done by using the Autodesk PrintStudio program, which optimizes support structure distribution for your design. Printing is estimated to take 8 hours per handle.
3D Model and Print IR Casing
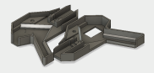
Because of the added IR component to the end of the claw, we chose to create a prong end that would fit the IR sensor we were using. Additionally, we chose to design the casing so the existing casing opposite to the IR sensor would fit inside when closed.
IMAGE OF 3D MODEL
Like the handle, we recommend using Autodesk Fusion and PrintStudio. Printing is estimated to take 2 hours.
Assembly
Handle
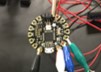
When the handles are completed, and the FLORA, OLED, and battery are available, they should be assembled.
The FLORA will fit in the handle and be held by the plastic extrusions built into the handle.
The sensors and screen should be soldered to wires and then to the I^2C pins on the FLORA. This allows for full transmission of data between components.
The battery is designed to fit into the FLORA, and should be plugged accordingly
The wires for the IR sensor and Accelerometer should be soldered into the FLORA and threaded through the appropriate hole towards the outside of the handle.
The metal shaft of the existing claw should be fit into the appropriate enclosure in the handle. If the margin of error in the 3D printer has adjusted the dimensions of the enclosure to be too wide to snugly fit the shaft, adjust the thickness of the shaft with electrical tape.
To attach the OLED screen, battery, and FLORA, use electrical tape and attach to appropriate locations in the handle.
Using the threaded holes on the two sides of the handle, close the two sides together and reinforce with electrical tape if needed. The handle should now be closed and attached to the metal shaft of the existing claw.
IR Sensor
At the end of the existing claw, one of the two pads must be unscrewed from the rest of the claw. (Save the nut and bolt from this step. You will use it later.)
Solder the pins of the IR sensor to the appropriate I^2C wires threaded out of the handle.
When the IR sensor is completely soldered, use the nut and bolt from the first step to attach the new casing to the claw.
Accelerometer
Because of the calibration used in the creation of the accelerometer code Leopard Keyboard has provided, we recommend using electrical tape to attach the accelerometer to the absolute end of the metal shaft. This will ensure that the changes in accelerations detected accurately reflect the actions they are meant to detect.
Similarly to the IR sensor, the accelerometer should be soldered to wires using the appropriate I^2C pins from the FLORA in the handle.
To ensure security, another layer of electrical tape should be used to cover the top of the accelerometer.
Binding
Using the electrical tape left, first coil the tape around any exposed wires on the claw to secure them. The motion for wrapping the claw should be similar to wrapping the handle of a tennis racquet.
Once the tape has been used to seal the handle, use thick green ribbon as the last layer for a refined look. This should be applied in the same manner as the tape.


留言